Build a Decentralized Lending App With Compound
- Published time

Introduction#
I remember the excitement I felt when I first heard the idea of AirBnB. People share unused space to travelers who need to have a place to stay.
Now I am feeling the same kind of excitement in the crypto industry. With the Compound protocol, we can share unused crypto assets to borrowers who can make good use of it. The Compound is the crypto equivalent of AirBnB that allows lenders to earn up to 10% in the almost risk-free way.
The goal of this post is to build a simple application that lends Sai and withdraws it with interests. You can see the finished code here.
Before we start coding, I cover the basics of the Compound first. Then we play with some smart contracts in Etherscan which are going to be called in our code.
Note: MakerDAO announced that they call the old Single Collateral Dai Sai and the new Multi-Collateral Dai Dai. Thus, in this post, I call the old Single Collateral Dai Sai.
Compound in a Nutshell#
Compound is a decentralized lending protocol on the Ethereum blockchain. Anyone around the world can participate in the protocol.
They create interest rates market for Ethereum tokens and ether. As of November 20, 2019, they have seven markets:
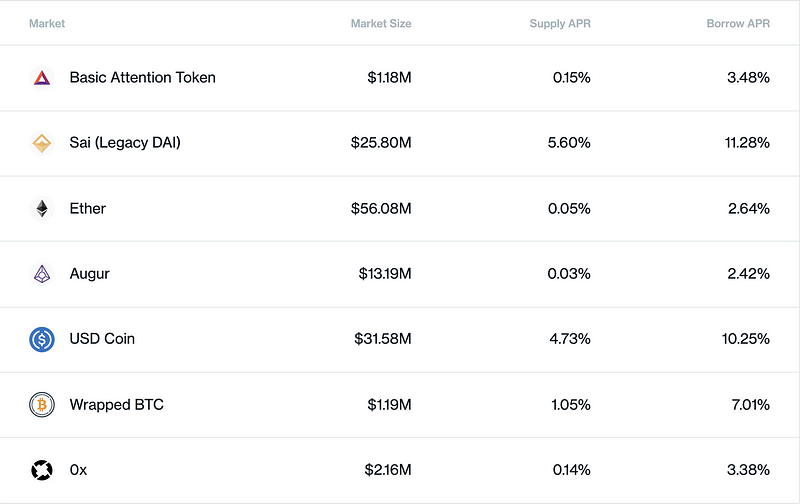
There is a separate lending smart contract for each market. As a lender, you can supply assets to their smart contract and earn interests. As a borrower, you can borrow assets from the reserved assets in the smart contract by depositing some collateral and paying interests.
Neither a lender or a borrower has to specify interest rates. The interest rate is automatically determined by market forces. When the demand to borrow an asset is low, interest rate is low. Conversely, when the demand to borrow an asset is high, interest rate is high. More on this later.
Also, neither a lender or a borrower has to specify a duration. As I mentioned before, the protocol requires borrowers to maintain excess collateral to avoid the risk of a borrower defaulting. Just like MakerDAO, their collateral is subject to liquidation if the price goes below a certain amount.
Traditionally, you’d have to match lenders and borrowers, and then negotiate terms such as interest rate, collateral, and maturity. The Compound reduces the cost of coordinating lenders and borrowers through their reserve system, and reduces the negotiation cost through their automatic interest rates mechanism, pre-defined collateral types, and a duration-free model. As a result, people can lend/borrow tokens much easier and faster.
An Equilibrium Interest Rate Model#
Interest rates change dynamically by following the liquidity available in each market, and fluctuate every block based on supply and demand. The less liquidity there is, the higher interest rates are. The more liquidity there is, the lower the interest rates are.
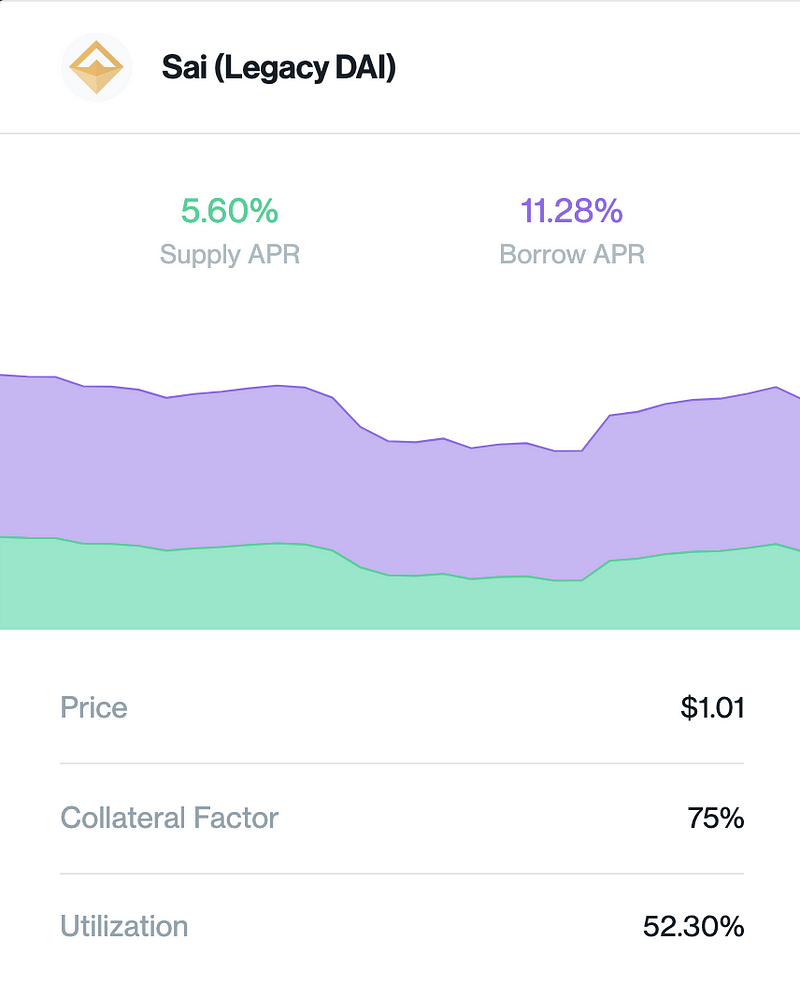
If you look at the Compound dashboard, you can see that interest rates(aka. Annual Percentage Rates) fluctuate. You can also check the Utilization for the liquidity available in each market(see the example of Sai below). The utilization rate is the percentage of total assets being loaned out to borrowers from the liquidity pool. If the utilization rate were 90%, 10% of Sai is available for withdrawals. Thus, when the utilization rate is high, APR is high. When the utilization rate is low, APR is low.
cToken#
How do lenders gain interests ex? Let’s take a look at a transaction where somebody supplies Sai to the Compound smart contract. In this transaction, you can see she supplies 7600 Sai. You can also see that she gets about 361,487 cSai in exchange.
 *Ignore the USD value. It’s wrong.
cSai is an ERC20 token that represents your balance including the value of Sai and interests accrued. In Compound, earning interest is as simple as holding this cSai.
The value of cSai increases over time as it accumulates interest every Ethereum block. If you want to withdraw Sai, you simply exchange it with your cSai(cSai is burned at this point). Then you can get back your Sai with interests.
cSai is one of cTokens that exists in Compound. Each market has its own cToken like cSai, cEth, cBat, etc.
Using ERC20 compliant methods and other methods in cToken contracts, users can supply assets, withdraw them, borrow them, repay a borrow, transfer them, etc.
Play in Etherscan to Understand the Smart Contracts#
Next, let’s play with smart contracts in Etherscan to understand some features we are going to build.
We will send some transactions using MetaMask. You need to have some mainnet ETH and Sai. If you have some Eth but not any Sai, go to Uniswap to get some.
There are three steps to supply and then withdraw Sai.
- call the approve function in the Sai token contract to give approval to the cSai contract to transfer some Sai
- call the mint function in the cSai contract to supply some Sai and get some cSai in exchange
- call the redeemUnderlying function in the cSai contract to exchange my cSai with Sai
1. the approve function#
Go to Etherscan’s Sai token contract page. Click on “Connect to Web3” and log in to MetaMask. Now you can send transactions with MetaMask.
Before supplying Sai, you must first approve the cSai contract to access your Sai balance. Go to the “Write Contract” tabs. Scroll down to the approve function. Specify the amount of Sai you want to approve.
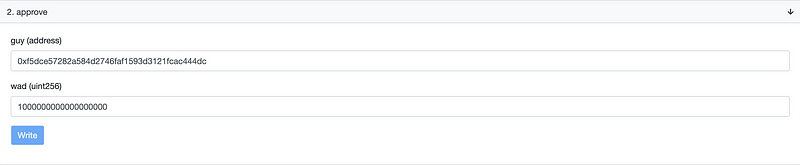
Make sure you give eighteen 0s. The math in Solidity is fixed-point, and the Sai contract specifies decimals as 18.
Thus, if you want to approve 1Sai, you need to pass:
Copied!1000000000000000000
// 1 * 10 ** 18
Click on the Write button and send a transaction. Wait for your transaction to be mined. Add more gas if it is too slow.
Now the cSai contract should have the approval to transfer 1 Sai on behalf of you.
2. the mint function#
Next, go to the cSai smart contract page. Click on ”Connect to Web3” and log in to MetaMask again.
By supplying your Sai into the cSai contract with the mint function, you can get some minted cSai tokens back.
Copied!function mint(uint mintAmount) returns (uint)
Specify the amount of Sai you want to supply in the mint function.

Click on the Write button and send a transaction.
You should be able to see that 1Sai is subtracted and some cSai is added from/to your account.
3. the redeemUnderlying function#
There are two ways to withdraw your Sai. You can specify the number of Sai or the number of cSai to exchange with Sai.
The redeemUnderlying function takes the amount of Sai as an argument. The redeem function takes the amount of cSai. We will use the redeemUnderlying function here for simplicity:
Copied!function redeemUnderlying(uint redeemAmount) returns (uint)
Specify the amount of Sai you want to withdraw in the redeemUnderlying function:

Click on the Write button and send a transaction.
You can see that you returned cSai and received Sai instead.
You should also be able to see that there is still a tiny amount of cSai in your account. That’s the interest you accumulated.
Set-Up#
All right, let’s get started with our application. Again, we will build a simple JavaScript application that lends and withdraws Sai. You can see this repository for the finished code.
Obtain Your Private Key and Address
First, obtain your private key and address in vanity-eth. Click on the “Generate” button at the bottom. Keep them somewhere for now. Please do NOT use them other than testing purposes. It’s not safe.
Get Some Eth and Sai
Send some Eth and Sai to the address you just obtained. 0.01 Eth should be enough to pay for the gas. I will supply only 1 Sai in this post.
*We will use mainnet cSai as, unfortunately, it is difficult to get testnet Sai tokens.
Get the Infura Endpoint
We will use Infura as a provider to communicate with the Ethereum network. Make an Infura account and get the endpoint at Mainnet by making a new project. It should look something like this:
Copied!https://mainnet.infura.io/v3/[PROJECT_ID]
Start a New npm Project
Copied!mkdir eht-compound-demo
cd eht-compound-demo/
npm init --yes
*If you don’t have npm and nodejs, install them from here.
Initialize Git
Copied!git init
Install the web3 Package
Copied!npm i — save [email protected]
web3 is the Ethereum JavaScript API. It is an interface to Ethereum networks. It communicates with an Ethereum node or transacts with smart contracts deployed on the blockchain from your JavaScript application.
Install the ethereumjs-tx Package
Copied!npm i --save [email protected]
We use ethereumjs-tx to create and sign transactions.
Add Scripts to package.json
Copied!“scripts”: {
“approve-sai-main”: “node — experimental-modules ./approveSaiMain.mjs”,
“supply-sai-main”: “node — experimental-modules ./supplySaiMain.mjs”,
“withdraw-sai-main”: “node — experimental-modules ./withdrawSaiMain.mjs”
},
mjs is a file extension that allows you to write with ES6 syntax.
Make saiTokenContract.mjs file and cSaiContract.mjs file
You can just copy the files from here and here.
In these files, I am simply declaring and exporting the abi and the address of sai token contract and the cSai contract.
Implement the Feature to Lend Sai#
Now we will start writing code. Let’s start from a lending feature.
We will make two separate files:
approveSaiMain.mjssupplySaiMain.mjs
1. approveSaiMain.mjs#
Make a New File
Make a new file approveSaiMain.mjs.
Import Packages
Copied!import Web3 from “web3”;
import EthTx from “ethereumjs-tx”;
Import cSaiContract and saiTokenContract
Copied!import cSaiContract from ‘./cSaiContract’;
import saiTokenContract from ‘./saiTokenContract’;
Set Up Web3
Set up Web3 to use Infura as your web3 provider:
Copied!const web3 = new Web3(
  new Web3.providers.HttpProvider("https://mainnet.infura.io/v3/[YOUR_PROJECT_ID]"
  )
);
Declare Your Address and Private Key Variables
Copied!const addressFrom = “[YOUR_ADDRESS]”;
const privKey = “[YOUR_PRIVATE_KEY]”;
Instantiate the Sai Token Contract
You use the Contract method of web3 with the address and abi to instantiate the Sai token contract.
Copied!const saiTokenContractInstance = new web3.eth.Contract(
  JSON.parse(saiTokenContract.saiTokenContractAbi),
  saiTokenContract.saiTokenContractAddress
);
Now we are ready to call the sai token contract methods.
Declare Const Variables to Pass to the approve Function
Copied!const ADDRESS_SPENDER = cSaiContract.cSaiContractAddress;
const TOKENS = web3.utils.toHex(-1);
You can pass 1 * 10 ** 18 to the second argument of the approve function, but in practice, it’s a common convention to pass -1 so that your users never have to approve again. If you want to understand how this works, read this.
Encode the Abi for the approve Function
Copied!const approveEncodedABI = saiTokenContractInstance.methods
  .approve(ADDRESS_SPENDER, TOKENS)
  .encodeABI();
Declare the sendSignedTx Function
Make a function to sign a transaction object and then propagate that to an Ethereum network:
Copied!function sendSignedTx(transactionObject, cb) {
  let transaction = new EthTx(transactionObject);
  const privateKey = new Buffer.from(privKey, "hex");
  transaction.sign(privateKey);
  const serializedEthTx = transaction.serialize().toString("hex");
  web3.eth.sendSignedTransaction(`0x${serializedEthTx}`, cb);
}
Construct a Transaction Object and Then Execute sendSignedTx
Copied!web3.eth.getTransactionCount(addressFrom).then(transactionNonce => {
  const transactionObject = {
    chainId: 1,
    nonce: web3.utils.toHex(transactionNonce),
    gasLimit: web3.utils.toHex(100000),
    gasPrice: web3.utils.toHex(5000000000),
    to: saiTokenContract.saiTokenContractAddress,
    from: addressFrom,
    data: approveEncodedABI
  };

sendSignedTx(transactionObject, function(error, result){
    if(error) return console.log("error ===>", error);
    console.log("sent ===>", result);
  })
}
);
Set the gasLimit to 100000. You can change gasPrice if you want to pay less. Check out the current optimal gasPrice in EthGasStation. You can convert its gwei value to wei in Ethereum unit converter.
Run the File
Copied!npm run approve-sai-main
Once you get a transaction hash like this _0xa18d71767ba95b95831fbf3a441494165002bc5f4104afdb0406511ebce7cbe3_, you can go to Etherscan to see the detail of your transaction. Below is my transaction as an example. If your transaction doesn’t go through, increase your gasPrice and send another transaction.
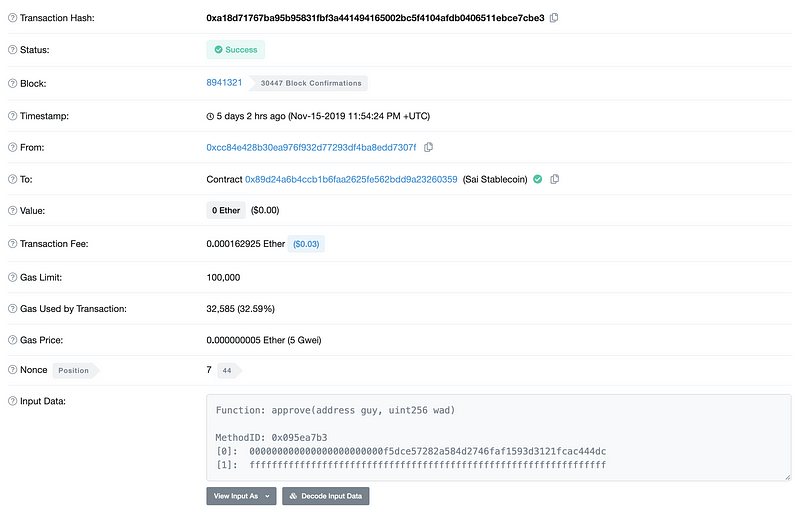
You can see that I called the approve function in “Input Data”.
2. supplySaiMain.mjs#
I make another file, supplySaiMain.mjs, and call the mint function this time. I am going to skip the detail as most of the code is going to be the same. You can see the finished code in the repo.
Encode the abi of the mint function with the amount of Sai you want to mint.
Copied!const MINT_AMOUNT = web3.utils.toHex(1 * 10 ** 18);

const mintEncodedABI = cSaiContractInstance.methods
  .mint(MINT_AMOUNT)
  .encodeABI();
Pass this ABI to a data property in a transaction object. Also, set the gasLimit to 200000 this time:
Copied!web3.eth.getTransactionCount(addressFrom).then(transactionNonce => {
  const transactionObject = {
    chainId: 1,
    nonce: web3.utils.toHex(transactionNonce),
    gasLimit: web3.utils.toHex(200000),
    gasPrice: web3.utils.toHex(5000000000),
    to: cSaiContract.cSaiContractAddress,
    from: addressFrom,
    data: mintEncodedABI
  };

sendSignedTx(transactionObject, function(error, result){
    if(error) return console.log("error ===>", error);
    console.log("sent ===>", result);
  })
}
);
Run the file:
Copied!npm run supply-sai-main
You can see that 1Sai is transferred from your account. You can also see that you get some cSai in exchange.

Implement the Feature to Withdraw Sai#
Lastly, we are going to build a feature to withdraw Sai. Again, I am going to skip the detail as most of the code is going to be the same. You can see the finished code here. I make another file, withdrawSaiMain.mjs, and call the redeemUnderlying function this time.
Encode the abi of the redeemUnderlying function with the amount of Sai you want to withdraw.
Copied!const REDEEM_AMOUNT = web3.utils.toHex(1 * 10 ** 18);

const redeemUnderlyingEncodedABI = cSaiContractInstance.methods
  .redeemUnderlying(REDEEM_AMOUNT)
  .encodeABI();
Pass this ABI to a data property in a transaction object. Also, set the gasLimit to 400000 this time:
Copied!web3.eth.getTransactionCount(addressFrom).then(transactionNonce => {
  const transactionObject = {
    chainId: 1,
    nonce: web3.utils.toHex(transactionNonce),
    gasLimit: web3.utils.toHex(400000),
    gasPrice: web3.utils.toHex(5000000000),
    to: cSaiContract.cSaiContractAddress,
    from: addressFrom,
    data: redeemUnderlyingEncodedABI
  };

sendSignedTx(transactionObject, function(error, result){
    if(error) return console.log("error ===>", error);
    console.log("sent ===>", result);
  })
}
);
Run the file:
Copied!npm run withdraw-sai-main
You can see that you get your 1Sai back and sent some cSai back to the cSai contract.

When you see your cSai balance, you still have a tiny amount. That’s the interest you accumulated.

Summary#
We learned that the Compound is a decentralized lending protocol on the Ethereum blockchain that allows everybody in the world to lend or borrow crypto assets with no permission. Since it eliminates the coordination cost and the negotiation cost, it’s much easier and faster to use in comparison to other p2p crypto lending systems that have existed.
We also learned that lending and withdrawing in Compound is as simple as calling three methods in smart contracts. You can integrate this simple app into your dapp or wallet to accelerate the open finance revolution.
I hope now we share the same excitement of the crypto sharing economy.